

This is the fifth article of The Elementary Series. I will cover the rationale behind the use of hotkeys and control groups.
Introduction
We all have different habits in regards to hotkeys and control groups, and I am not going to tell you what the best way is. As per my usual style, I explain things logically, and put forward my argument of what I think is optimal or close. However, there are still some habits that every player should adopt regardless of so-called preferences, and I will point those out in this article. Before I get to the main content, I will ask you one question, and the answer sets the foundation for the whole post.
Imagine you are told to evaluate how good a player’s mechanics is based on her/his stream video (i.e., first player view), and you can only look at each clip for no more than ten seconds. What are the things you will look at in that short amount of time to make your best judgement? If you can, point it down to one single thing. Try to answer it in your mind, there is no right or wrong answer. After you have done so, watch the clip below.
My answer to the above question is to look at how often the mouse cursor is in the middle of the screen. This allows you to minimise the mouse movement, which directly leads to mechanics efficiency. The above vod is a first player view of INnoVation’s game against sOs way back in 2013. I pick INnoVation as the example because he is well regarded by other progamers to have the most “clean and efficient” mechanics. You can tell that INnoVation’s mouse cursor is almost always around the middle of the screen.
The purpose of hotkeys and control groups is essentially to keep our mouse cursor around the middle of the screen as much as possible. This is done by replacing mouse clicking actions with keyboard clicks whenever it is realistically possible. A keyboard command is quicker and more precise than a mouse click, because the mouse has travel time and the keyboard does not.
Hotkeys
Hotkeys refer to the key pressed on the keyboard to execute a command. For example, you can click “A” to produce a Marine on a Barracks rather than clicking on the Marine icon with your mouse.
It is always better to use hotkeys than to click with a mouse. Some argue that it’s better to use mouse if the hotkey is out of reach on the right of the keyboard like “P” for patrol, but it is more of a hotkey set up problem than a merit issue. There are several mainstream hotkey set ups, and it is down to individual preferences in regards to comfort versus ideal. Thus, it is right to always use hotkeys, but there is no right or wrong in the set up itself.
Ideally, you want to have the shortest time to execute an action, and this can be achieved by
- minimising finger travel time from one key to another,
- and minimising finger repetition.
Minimising finger travel time can be achieved by having the keys close to each other. This also helps to keep your hand at the default position, so you do not have to move your whole hand (clearly you need to move your fingers). Minimising finger repetition is to avoid using the same finger repeatedly. It is always quicker to click two keys one after another with two different fingers than with the same finger.
While these two points are indisputable in terms of sheer efficiency, one has to consider the trade off with idiosyncratic preferences. If you’re comfortable with one layout over another, then just do what fits you the best. Most players use one of the three layouts below based on their preferences.
Three mainstream layouts
The three mainstream layouts used by most players are (a) the standard (default), (b) the grid, and (c) TheCore. The default layout is better than many give it credit. It is arguably the most intuitive one, and it is easily adopted by someone who has experience with other RTS games especially one made by Blizzard. However, some keys may not be at a comfortable position, for example, “P” is for patrol which is relatively far away from the main keys on the left. Nevertheless, the main keys are still decently placed. I use the standard layout with some minor changes to some hotkeys for my personal preferences.
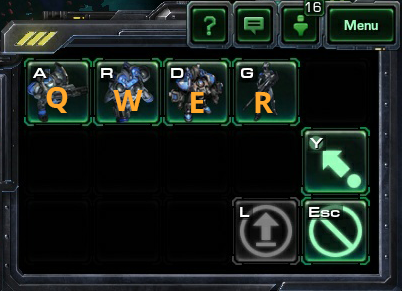
The grid layout is, in my opinion, the best layout overall. As its name suggests, the grid layout fits all hotkeys within the “grid” of the keys on the left of the keyboard (see image below). “Q” is the key for the command of the top left corner item for everything.

For example, “Q” is for Marine in Barracks command card (see image below). While you have to memorise the specific hotkey for each thing in the standard layout, you have to memorise the position of the items in the grid layout. With that being said, it is a lot easier to apply the grid layout than the standard layout when you play multiple races.
TheCore layout is not in the game by default, and you have to either install it or create it manually in game. It is built on the premise of maximising efficiency, and eliminating personal preferences. In short, it is theoretically the most efficient layout I know, but it is definitely not an intuitive layout. You can watch the video below to know more about it.
Other considerations
Target fire
Although I said it is always more efficient to use hotkeys than to use mouse clicks, target firing is one interesting exception. To execute a target fire action, you normally do the following.
- Select your own unit(s).
- Press attack command hotkey (“A” by default).
- Left mouse click on target.
Alternatively, you can execute the same command by doing the following.
- Select your own unit(s).
- Right mouse click on target.
You actually have one fewer command when you do not use the attack command hotkey, and your mouse movement for the two is the same. Thus, in terms of efficiency, it is actually better to not use the hotkey than to use it. However, the attack command prevents your units from executing a move command if you miss-click. This is because, when you miss-click by not right clicking on the target unit, you are likely to click on the ground next to the target unit which will issue a move command instead. Therefore, if you miss-click, at least your unit will still attack its default target, and it does not just move forward.
Rapid Fire
Rapid Fire is an advance hotkeys setting that is difficult to explain well with just words, so I recommend you to watch the video playlist below for more information. Long story short, it allows you to repeat the same “spell casting action” quickly without a mouse left click that is normally required. This may not be the most comfortable option for everyone.
Idle worker
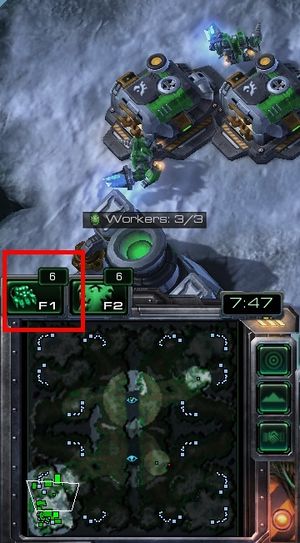
Idle worker hotkey allows you to select workers that are not mining or executing a command (e.g., moving). The default hotkey is F1 (see image below). It is essentially a preset control group hotkey for idle workers. It is the implications that is of interest.
You can use idle worker to split workers against harassment attacks. Let say Banelings are rolling toward your mineral line. After you pull your workers away, you have to split them to minimise the damage. The idle worker trick allows to you split each individual worker quickly with these steps.
- Select the workers.
- Press the stop command (“S” by default). Now the workers selected are idle workers.
- Hold the idle worker hotkey, and spam right click (basic move command) at different places to move the workers to those selected places.
You are always selecting an idle worker when you hold the idle worker hotkey. After you have right click to move the “randomly” selected idle worker, the idle worker hotkey automatically select another idle worker because the earlier idle worker is no longer idling with the move command. The video below demonstrates how it looks like. You can also add Rapid Fire to idle worker split (more information in the Rapid Fire playlist above – or you can just click here).
The other implication of idle worker hotkey is to remind yourself to build something (only applicable to Terran). If you do not queue a command for the Scv to return to mining after constructing a building, it will idle when the building is completed. This idle worker sign tells you that your building has completed if you have no other idle worker. It has two practical implications.
- It allows you to carry out your build order better. For example, you want to build a Starport right after the Factory is completed. You don’t need to have your screen locked on the Factory to ensure you know it is completed, because the idle worker sign tells you when the Factory is completed.
- It reminds you to keep building Supply Depots in the mid to late game. There will be a point in the game that you just have to keep making Supply Depots to ensure you are not supply blocked. A simple way is to have two to three workers to keep building Supply Depot after they are done with the previous ones. This should also be an easy way to prevent you from building too many at one go.
You can read more about this here.
Control groups
Control group is a hotkey created during the game to allow you to have quick access to the following,
- Building
- Unit
- Location
There are two steps to this.
- Create a control group.
- Recall that control group.
Building
You should always have your production building bound to a control group. The only thing that is up for personal preference is the set up. Using Terran as an example, some players group Barracks, Factory, and Starport in the same control group, while some put them in three separate control groups. I strongly recommend you to read this article on the trade off, and I have presented the advantages of the combined method. The town hall buildings (i.e., Command Centre, Nexus, and Hatchery) should all be in the same control group.
An upgrade building should also be bound to a control group, because you want to check whether a specific upgrade has completed before you commence a battle. The typical upgrade buildings are usually bound to a control group, so that you can continue to the next level upgrade more efficiently. However, it is debatable whether you should group the upgrade buildings in the same control group. Let’s use two Engineering Bays for example. The advantage of having the same control group is obviously convenience. It also reduces the error of queuing attack and armor upgrade in the same Engineering Bay while the other is not upgrading anything. The disadvantage is you cannot see the progress of the upgrade when you have more than one building grouped together. The actual progress of upgrade is a very important piece of information to whether you are about to make an attack.
Sometimes you may want to have specific supply building in a separate control group. For example, you can have the lowered Supply Depot of your wall bound to a control group, because this allows you to raise it up quickly to prevent a run by.
Unit
The number of control groups you should have for units is down to individual preferences, and the optimal number should be two to four in my opinion. Again, it is a trade off between comfort and ideal.
The set up of control groups is also down to individual preferences, and this varies according to the race. For example, Protoss can have the main army in 1, spellcaster in 2, and Warp Prism in 3. In contrast, Terran can have the main army in 1, support unit in 2, and a drop in 3. Things can get more complicated when there are too many types of units in the composition, and you have to take their unit hotkey priority into consideration. For example, you don’t want to group Ghost and other bio units together, because you have to click tab after selecting the control group before you can use Stim.
Some have asked whether you should have Widow Mine in a separate control group for a MMMM army. If you have control group to spare, why not. But what if you have two other drops at the same time? This is something that even professional players do not have a consensus. In my opinion, it is better to prioritise different groups of army than to have different control groups for unit type. That is, I rather have one control group for each drop, and do not have another control group for my Widow Mines. My reasoning is based on the point I mentioned at the start of the article, which is to have my mouse cursor at the middle of the screen as much as possible. You are forced to click on the mini map often to go to your drop without a control group, then you have to move the mouse back to the main area to select the units again. I rather have to manually select a specific type of units (ctrl + left click), because my mouse is still around the middle of the screen.
Control group stealing is an advance unit control group feature, which removes units from one control group and adds them to another existing control group (or create another control group). Watch the video below to have a better understanding.
Location
All else equal, it is always better to have location hotkeys, at least for the three main bases. As suggested by some, it is less instinctive than building and unit control groups. I think this is because the difference of using versus not using location control groups is relatively not obvious. If you were to play a game without control groups, I am sure you struggle a lot with not using building and unit control groups, but location control group is the least of your problem. However, when you go back to the argument of having the mouse in the middle of the screen, it is clear that location hotkeys improve efficiency.
Let say, you want to go back to your base to build two buildings without location hotkeys. You first have to click on the mini map, then move the mouse cursor back to the main screen to select the workers accordingly. The mouse movement makes the chain of actions slower than necessary. The benefit of using location hotkey is even more obvious when you have to build the buildings in different bases. For example, you want to build a Missile Turret in each of the mineral lines you have. It is not intuitive to remember which base you have already built a Missile Turret as you try to build one in each mineral line. Even if you form a habit of always start from the main base, then natural, then third base, your click locations vary according to the map and spawn location. Thus, the speed is not only slowed down by the mouse movement, but also by the additional conscious decision to select specific locations on the mini map. With location control groups, you go to location 1 with the hotkey and add a Missile Turret, then you repeat with location 2 and 3. This chain of action is consistent across different maps and spawn locations.
The town halls should be centred to maximise the benefit of location control groups. That is, you should set each of your location hotkey with the respective town halls precisely at the middle of the screen. Look at the two images below for a comparison.

Centred

Not centred
By centring the town hall to the middle of the screen, the mineral patches and gas geysers at the different bases have the similar distance to the middle of the screen or the respective town halls. Consequently, you develop a muscle memory of how far these important peripherals are from your default mouse cursor location, which is the middle. This allows you to macro more efficiently, and handle various situations better. For example, you want to drag your works away from the mineral line against a drop. This again highlights the importance of having your mouse cursor in the middle of the screen as much as possible. You can read more about this here.
You can also set a location hotkey for the place you set your rally (more information here).
The default location hotkeys are F5 to F8. Most players who use the standard or grid change them to F1 to F4, which are a lot more accessible than F5 to F8. Since F1 is the default idle worker key, I change it to ` because of my Warcraft III habit. I also change my select all army hotkey from F2 to F5. I know the select all army hotkey is controversial, but I believe it is always good to have it in case you want to use it.
Summary
You should strive to have your mouse cursor in the middle of the screen as much as possible. It is almost always better to use hotkeys and control groups than to use mouse click for the same command. Personal preference only comes into play for the set up and layout.
The rights to the videos in this article below belong their respective owners, and I did not make them.
If you enjoyed this article, I’d love you to share it with one friend. You can follow me on Twitter and Facebook. If you really like my work, you can help to sustain the site by contributing via PayPal and Patreon. See you in the next article!

Another useful article. :)
I’m curious about the possible ways of setting the unit control groups. What are the pros and cons, and should it be changed halfway? Also, what if you split an army and fight from both ends? Should you use 1 control group for each army? What is the best way to use tab or selecting certain units from one control group?
Usually you don’t change your control groups for buildings. You have a fixed set of control groups for units (e.g., 1-3), and you would change within these control groups as the game proceed. For example, I use 2 for my Hellions in the early game, but I use 2 for my hit-and-run squad in the mid game.
Generally, it is advised to use two control groups for two different groups of army at different places, as it is easier to control that way.
You can select a certain type of units in a control group by using “tab”, or ctrl + left click one of that unit, or double left click one of that unit.