
This is part two of a two-part article series on mechanics.
The series covers the following subtopics,
- Definition
- Assumptions
- Macro
- Micro
- Trade off
The previous article has covered the basics and macro. This article covers the last two, so the focus is on micro and the trade off between macro and micro. This article is not limited to Terran.
Micro
Micro, or micro management, is the ability to maximise the value of units.
I intentionally define it broadly in order to cover as many situations as possible. When you think about different micro moves, they all ultimately come down to maximising the value of units in two ways.
- Maximise a unit’s survivability.
- Maximise a unit’s utility (usually means damage output).
Logically, both go hand in hand, because a unit can deal more damage by surviving for longer. However, things can get complicated when the two are negatively related in the immediate context. For example, when a High Templar casts a Psi-Storm on a group of bio units, the bio units can either continue to maximise their damage output by standing still or move out of the area of effect to maximise their survivability. This is a decision that has to be made on the fly based on various situational factors. For example, you should favor survivability for Banshee in general, but you should just maximise its damage output when you know it cannot realistically escape.
Conversely, you should also minimise the value of opponent’s units, while you maximise the value of your units. Sentry’s Force Field is a perfect example for this. In the video below, opponent’s group of units is cut in half, and those units at the back cannot deal damage. Further, the units at the front cannot stutter step backward against the Zealots, and this reduces their survivability. This can also be done by utilising the terrain, and you can take a look at this for example. The Marines move behind the mineral lines to use the gaps of the mineral crystals as choke, and this drastically reduce how effective Zerglings can maximise their damage output.
The purpose of this post is to provide a generalisable guide on micro, so I will not go through situational specific micro (e.g., bio split against Baneling). The several micro tips I mention below are the basics that can be applied to most situations. Just to be clear, micro does not necessarily have to be battle-oriented, for example, stacking workers is a form of micro (i.e., it maximises its utility). But I limit the discussion to battle situations for parsimony reasons.
Concave and convex
Maximising damage output is the most straight forward way to maximise a normal unit’s utility. A simple and effective way to maximise units’ damage output is to ensure they are attacking as often as possible. Units in a concave get into their effective attack range more efficiently than they would in a convex. A video tells a thousand words, see the one below by brownbear (timestamped).
As shown above, Marines in a concave (those on the right) beat those in a convex (those on the left). You can see that those Marines at the back of the convex are trying to get around those friendly Marines at the front to attack, and they are basically not dealing damage while those Marines at the front are engaging. This essentially results in a battle between 44 Marines and 20+ Marines at the start even though both sides have 44 Marines.
With that being said, you don’t have to literally form a concave with the units, because all you have to do is to form a line with the units. You can A-move forward once you have formed a line, and the units will form a concave by themselves. In the video above, the Marines on right are simply spread out into small groups to form a line perpendicular to the attack direction, so you don’t have to ensure each unit is side by side to each other for the line. If you can, good. But you probably should spend the additional action input on something else.
Interestingly, forming a concave or a line of units in a real battle is less straightforward due to the terrain. In the video below, you can see the red player spreads the units to attack down both ramps instead of just A-move forward from one. If he attacks down from just one of the two ramps, it is a lot harder for the units to form a concave for the engagement.
This basic benefit of concave is fundamental to many tactical and micro moves in game. For example, it is always better to surround your enemy than attacking from just one direction in an engagement if the situation permits, because a surround can be seen as a big concave (see this for an example). Another good example is the advantage of controlling a ramp in general. It is difficult for units going through a ramp to form a concave, so the player who has control over the ramp has an advantage since the opponent has to engage in a convex. In the vod below, you can see the red player positions the units on top of the ramp, and just waits for the blue players to move his units up the ramp in a convex.
It is also important to note that convex is not always bad. As mentioned earlier, micro involves minimising opponent’s utility, and convex can achieve this goal in certain situations. Melee units’ attack is limited by whether the units can “touch” the target, and the “surface area” is reduced when target units are in a convex. The common way to utilise this advantage is to position range units as a convex in a place that the terrain helps to reduce the “surface area”. This is particularly effective when the scale of the battle is small. Below vod is an example.
Kiting and stutter stepping
Kiting and stutter stepping are arguably the same thing. The fundamental idea is to attack then right-click to move in a direction as a way to re-position better before attacking again. Each unit as an attack cool down, which refers to the amount of delay between the damage dealing actions, and the purpose of kiting and stutter stepping is to use this cool down period to re-position to your advantage. The term ‘kiting‘ is used when the units are moving backward, while the opponent is moving forward trying to attack your range units. This is particularly effective for range units to use against melee units. In line with the notion that micro should consider minimising opponent units utility, kiting does the job of keeping opponent’s melee units in a distance while you can still continue attacking. It is useful in both small and big scale battles. Below vod is an example of bio kiting backward against Zealots. The bio units attack, then move backward, then attack, repeat.
‘Stutter stepping‘ is a term usually used on bio for moving forward. While kiting is to keep opponent away to utilise your range attack advantage, stutter stepping forward is to keep opponent close to prevent them from escaping. This is commonly used when Marines are dropped in opponent’s mineral line, and the workers are being pulled away.
Target fire
Units will automatically attack the target in its attack range. Units also prioritise certain units over others based on proximity and “Override Target Priority“. In other words, the units may not attack the best targets, so you have to manually target fire accordingly. Which unit to target depends on many things, such as health, value, and position, and I will not discuss it here.
The key about target fire is that the smaller the battle scale, the more important it is to target fire. There are several reasons. First, it is simply easier to do it when the battle is small. You can assess which enemy unit you want to target since it is easier to process a small battle field with fewer variables. It is also easier to click on the target when there are fewer units. Second, one fewer unit makes a big difference in small battles due to scaling. Five versus four is much more advantageous than 50 versus 49. Third, overkill is negligible in small battle. It is obviously an overkill to have all Stalkers to target one Marine in a big battle with more than 100 supplies, but it is useful to select a small group of Stalkers (e.g., five to six) to target each Marine down one by one. Although it takes five Stalkers to one shot a Marine, the overkill of one to two shots is negligible compared to the benefit of picking off a unit (refer to the second reason).
Target fire is still useful in big battle, but one has to be selective in how and what to target. Imagine it is a TvP battle between Gateway units plus Colossus and MMM. Protoss would rather want the bio to hit the Gateway units instead of the Colossus, because this maximises the overall damage of the Protoss army. Thus, from Terran’s perspective, they will try to target fire down the Colossus without breaking the concave formation. This can be done by selecting a small group of bio after the main concave is formed, and specifically target firing down the Colossus by stutter stepping forward. Below vod is a good example, you can see that the Terran player selects a small group of bio at the south to target down the Colossus.
In a similar vein, Vikings should also target fire each Colossus individually by using the queue command (i.e., shift). Below vod is an example.
It is particularly useful when you know how many shots it takes one particular unit to kill the other. For example, it takes three Hellions to one shot a Drone, and two Banshees to one shot a Drone.
Unit positioning
Some units are better at the front, while some are better at the back. Using the same example above, Gateway units should be in front of Colossus. This is relatively easy to execute because Colossus have longer range by default, so they will stay at the back when you A-move. The same applies for Roach and Hydralisk, whereby the Hydralisks will be behind the Roaches due to their superior range. However, there are others that require more attention, for example, Marine and Marauder. You want Marauders to tank at the front for the Marines, but Marauder has a longer range than Marine. Thus, you sometimes have to manually select the Marines and move them backward.
Micro priority
Some units benefit more from micro than others. A good example is in the Zergling, Baneling, and Corruptor composition in ZvT. It is better to focus on managing the Zerglings and Banelings than the Corruptors. The Corruptors already are doing the job of attacking the Medivacs and tanking Widow Mine shots when they are A-move forward. This is the same for bio with Medivac, whereby you want to focus on the bio units and let the Medivacs do their job by not moving.
Trade off
I have covered macro in part 1 and micro above, and now I want to discuss the importance of trade off between the two.
No matter how quick a player is, you cannot be looking at more than one location simultaneously. A high level player “cut the screen” so quickly and issues commands at multiple locations gives the illusion s/he is macro-ing and micro-ing at the same time, but each command is still issued independently. Given that there is always a limit to a player’s action per minute (just a matter of how high the limit is), it is extremely important to know what to prioritise to ensure you maximise the effectiveness of your action per minute (APM). Consequently, a player constantly has to choose whether to spend the APM on macro or micro.
Things get more complex when the ways macro and micro work as a function of APM are different. Macro sort of has a “capped linear relationship” with APM. That means, the amount of APM you invest into macro is proportionate to the output: if you invest X APM, you get Y in macro. When you invest 2X APM, you get 2Y in macro, so on and so forth until you reach the cap that one extra unit of APM does not increase the output of macro. For instance, you cannot make your production quicker or better by clicking more. In contrast, micro arguably has a logarithm relationship. That is, although the battle outcome is going to be better with more APM, there is a diminishing return. The below image shows what I mean (my awesome drawing with Paint).
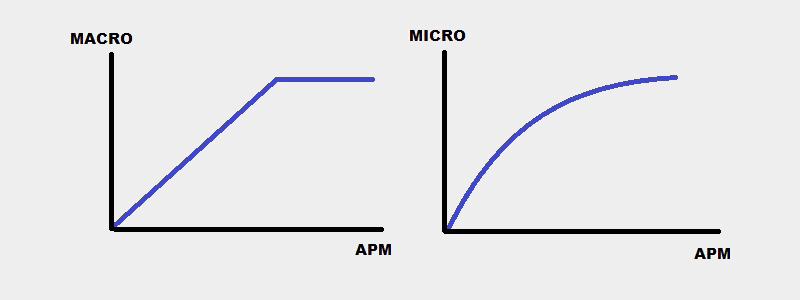
A good example for the diminishing return of micro is how much APM you want to invest into splitting your Marines against Banelings. A simple concave is a lot better than not micro at all. Then, as you pull back the small group of Marines that the Banelings are about to hit, the outcome is better but the difference is not as big as “simple concave versus no micro”. Then, as you split the Marines so much that a Baneling cannot deal damage to more than one Marine at time, the outcome is again better but the difference is even more marginal.
There is no magic formula to this, as the answer is always “depends”. However, from a practical stand point, it is generally a good idea to start off with investing as much APM as possible on macro until it reaches the cap, such that your economy management cannot be improved if you click more. Your subsequent APM spent on micro is then always better spent than on macro, because macro has already reached a cap. That is why you see pro players try to queue up as many units as possible before they engage if they initiate the battle.
Also, as I mentioned in part 1 that, I conceptualise attention as a dimension of mechanics, and it is related to both macro and micro. In simple words, attention refers to the degree to which a player looks at the right place at the right time. It is common sense that you prioritise to look at the big battle when it happens, and not at the Liberator you sent to harass opponent’s mineral line. When you apply this logic to the trade off of macro and micro, it is difficult to say which is more important. However, the fact that you do not need to look at the production building to make units, you should always prioritise looking at the units in battle. That is, you should prioritise your attention and screen time on “micro” over “macro”. The skill ceiling of how well you can squeeze in as much macro as you can while you are battling is infinitely high for a human. Below video is an example of how you should always look at the most important battle ground, and simultaneously macro without shifting your screen to your base.
Ending words
It is difficult to have several simple rules of thumb for micro, because the answer is often too complicated. Thus, I do not have a list like I did in part 1. In my opinion, forming a concave is always a good start for a battle, because everything else can be built on it. For instance, it is not that effective to split against Zerglings and Banelings, when you do not start with a decent concave.
I will end this post with this.
If you enjoyed this article, I’d love you to share it with one friend. You can follow me on Twitter and Facebook. If you really like my work, you can help to sustain the site by contributing via PayPal and Patreon. See you in the next article!

I think there is a cold beer with your name on it waiting for you in your paypal account. ‘nough said.
Thanks buddy!
Looking for clarification regarding focus fire. If you shift attack click multiple targets, do the units intelligently avoid overkill, such that any overkill damage would instead be targeted at the 2nd shift-targeted unit?
Based on what I know, yes for projectile attack units, like Vikings. In the vod linked above (between Flash and Super), Flash’s Viking overkilled the Colossus. You can see some Vikings’ shots landed in “empty space” after the target has already died.
Nice article! It will be great if you can cover some of the more specific micro with specific combinations of units, and some specific technical advice for improving at micro.
I didn’t know you play StarCraft. I always thought you may only read the “general” articles. What race do you play?
I just started recently and I used this “lockdown” period to finish all the campaigns, haha. Starting to explore the multi-player option now and watching some streams of pro games. I kind of like Zerg, but is it a must to pick a race?
Generally yes, it is easier to focus on one race. You can of course play all three races, but players usually have a “main” race.