

Siege Tank positioning is an art. In this article, I will discuss where you should position your Tanks based on several important considerations.
This topic is suggested by John via email, and I think it is important and interesting enough for an article. I spent a long time to think about how to structure the content.
The purpose of this post is to provide a general framework on Tank positioning that can be applied broadly. This strength comes with the limitation of not going into map specific and uncommon situational considerations. As the title suggests, it is about positioning, so micro moves like target firing and Tank mode related stuff are not discussed. This post is based on the presumption that Tankivac is not an option.
For generalisability and application reasons, I will cover the key considerations on deciding where to siege up, before I actually get into positioning itself.
Basics
The image below sums up the key stats necessary for this article. You can read the detailed stats on liquipedia. I use a splash radius circle (not drawn perfectly to scale) to graphically illustrate how the splash damage works, as it is tough on the brain to visualise what “units between .4687 and .7812 matrices of the target take 50% damage” means.
 3D model art by Vitaly Bulgarov (unit information by me)
Siege Tank is an immobile, high damage with slow cool down, and long range unit, and I want to lay down the foundations about these three things before I go into the key considerations about positioning.
In regards to mobility, the movement speed is not the a concern for this topic, but it is important to know the mode switch time is three seconds. The mode switch delay design means that you have to anticipate the battle and siege up before it happens. Many games are decided simply by whether the Tanks are siege up before the battle, and the result can be quite bipolar. This condition is the reason why Protoss try to be active on the map with Stalkers against an imminent Tank push (poke and pull back), as they want to buy time by forcing Terran to siege up preemptively several times on the way before the units reach Protoss’ base.
Cool down refers to the time between each shot is fired. High damage slow cool down means that the first shot is critical, and opponent has the opportunity to close down on the Tanks before the second shot is fired.
Siege Tank has one of the longest attacking ranges in the game, but it is important to note that the vision range is shorter than the attack range. This explains why players want to win the air battle in TvT Tank war, the vision advantage provided by the Vikings allows one player’s Tank to fire at the opponent’s Tank. The opponent’s Tank will not fire back even though the target is in attack range, as the unit does not have vision of the target.
Key considerations
Area lock down
When you combine the few points above, one key consideration is to let opponent comes to you instead of the other way round. In other words, you should not proactively try to get in range of opponent’s units, but you should lock down an important area that opponent is forced to break. This can be done by having a Tank siege up in range of the mineral patch, and it will be important to know where such positions are on different maps. Below images are some well known examples.


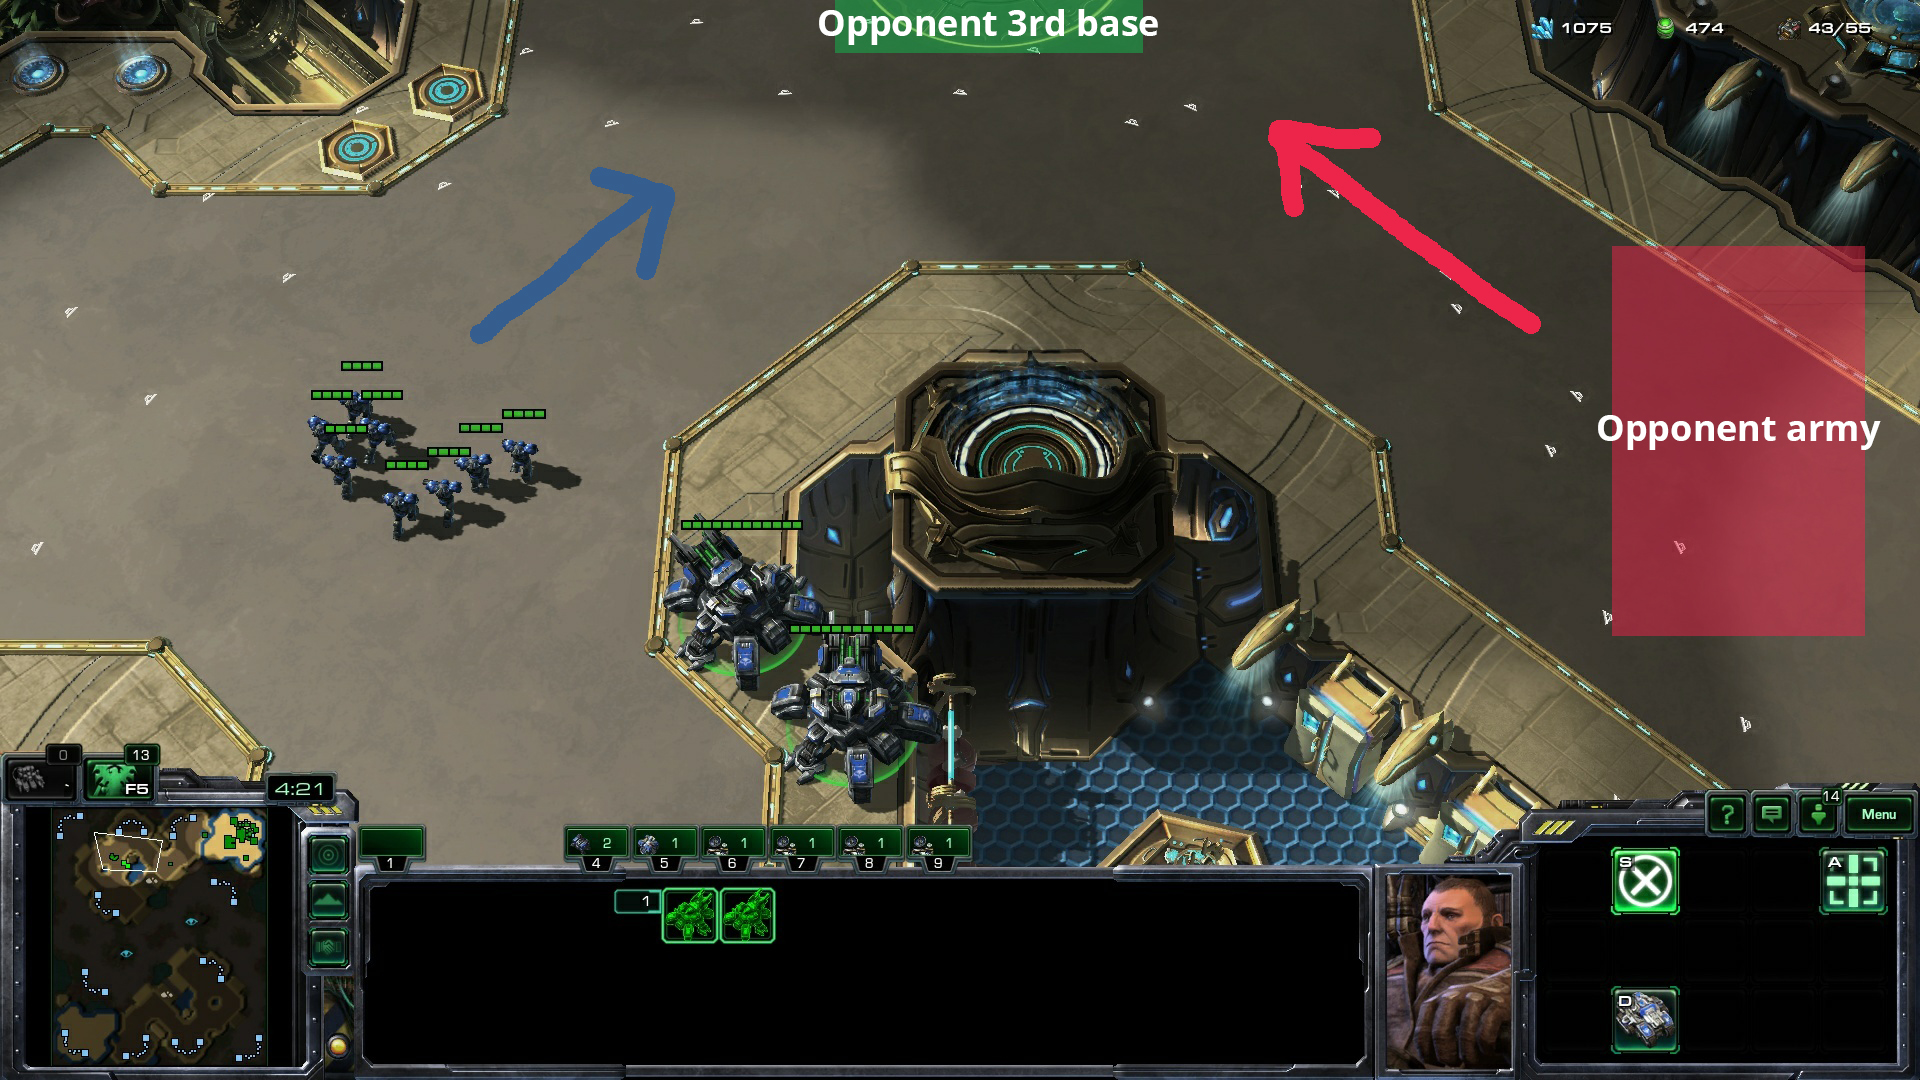
You can also force opponent to engage into you by locking down the key paths. All you need to do is get the Tanks in range of a path that opponent’s units have to get through in order to move to a certain location, and this is particularly effective if you can tactically force opponent to move to where you want them to. Below image is an example of that. You force opponent to defend against your attack at their third base by applying pressure, and opponent has to walk the units into your Tank’s attack range to get in defensive position. In short, if you can, filter opponent’s units into a choke point that is in range of your Tank shots.
Composition coherence and roles
Siege Tank is perhaps the most extreme unit in regards to its difference in efficiency between with and without other units around it, and it is almost always better to have other units of yours between your Tanks and opponent’s army in order to maximise the effectiveness of the Tanks. Thus, a critical and often overlooked consideration is what and where other units are when the Tanks are siege up. Broadly speaking, I want to separate the role of Siege Tanks in a bio composition and in a mech one, as they play different roles in different compositions.
In a bio based composition, Tank is used as a supportive unit for your bio force, which is your core. In TvZ for example, Your bio units do the main damage, but they cannot defeat any typical Zerg composition by themselves. Against a Zergling and Baneling based composition (let’s leave other support options like Widow Mine out of discussion), bio alone will always get swamped to death in a sizeable battle under normal circumstances no matter how godly your micro is. Tank’s aoe damage is cost efficient against this composition, and you can target fire Banelings before they get in range with the bio. Against a Roach and Ravager based composition, the bonus damage against armored units (Roach) is huge. The fact that both sides are using range units, it is awkward for Zerg to ignore the bio and try to get in range to hit the Tanks. If Zerg use Hydralisks in the Roach composition, Siege Tank is the answer against that. Generally, Hydralisks destroy bios without Tank support, because Hydralisks out-range Marines, and Marauders are very ineffective against Hydralisks even though they have the same range. In contrast, in a mech based composition, Tank is the core of the army, and other units are considered to be supportive units. An obvious example is in a bio versus mech TvT game, the Hellbats of the mech player play an important supportive role to block the bio units from getting in range of the Siege Tanks. Without them, bio units can easily stim and destroy the Tanks.
Spacing
Spacing out a group of Siege Tank is generally considered a way to maximise its effectiveness, but this is less important in Starcraft II than in Starcraft I. This is because Siege Tanks in Starcraft II do not “overkill” a unit like they do in Starcraft I. Watch the video below for a demonstration.
All the Siege Tanks in the video above are in range to shoot the Zergling, but only one fires due to the smart “no overkill” mechanics in Starcraft II. Without it, all the Tanks would have fired at the single Zergling, and hence, ten of the eleven Tanks would have wasted a shot to “overkill” an unit. Thus, Siege Tanks in Starcraft I are usually spaced out in order to prevent all Tanks to fire at one unit.
Spacing out Siege Tanks in Starcraft II can still be beneficial in certain situations. First, the area you cover is bigger, and this has obvious benefits in many situations. Second, the Tanks are less vulnerable to aoe effects like Psi-Storm and Blinding Cloud. Third, it is harder for opponent to drop on top of your group of Siege Tanks. Some of your Tanks do not attack these enemy units, because siege mode Tanks have a minimum attack range and they don’t attack units in melee range. Tank’s splash damage can friendly fire, so your grouped up Tanks will take damage from each other’s splash. Fourth, it is sometimes possible that those Tanks at the back can deal out more shots than they would have if they are grouped together closely with those at the front. This can also cause opponents to overestimate their ability to engage into you especially when they do not have vision of your whole army. The underlying reason behind this is Siege Tank’s superior attack range against every other ground unit.
Let’s use the image below to illustrate what I mean, imagine you have two rows of Siege Tanks, and opponent’s Roaches attempt to attack into them (from left to right in the image below). The circles are the respective attack range of the units. The first row of Tanks will fire before the Roaches are in range to attack due to the superior range. By the time, the Roaches are in range to attack the first row of Tanks, they are also in the attack range of the back row Tanks, as shown in A. Then, after the Roaches clear the first row, they have to move a certain distance before they can get in range of the back row. As shown in B, the Roaches have to move from the left red cross to the right red cross to get in range of the back row. The time required for the Roaches to stop and attack the first row, and then move from the first row to the second row may allow the back row Tanks to have extra shots. This effect is enhanced as the difference in attack range is enlarged.

You may argue that by having the back row Tanks in the front row, they can shoot first and in fact have the same number of shots. Let’s imagine the Roaches want to attack a row of Tanks, but they stop for a while once they are within the attack range of the Tanks. This “stop for a while” is obviously bad for the Roaches. Now imagine that row of Tanks that the Roaches want to attack is the back row, the “stop for a while” happens when these Roaches engage with the front row Tanks. This will not have happened if there is only one row. Therefore, the distance required for the Roaches to travel to get in range of the Tanks is constant, but the time the Roaches stay in the attack range of the Tanks while they themselves are not in range to attack the Tanks is longer if the Roaches have to “stop for a while”.
The discussion below is based on these key considerations. I will separate them into two broad situations whereby you are either attacking or defending.
When attacking
The goal of the attack should drive the tactical decisions made. When I review my own games, I often ask myself what I want to accomplish with the attack and whether where I position the Siege Tanks aligns with that goal. There were times when I lock down a location with Tanks that did not exactly accomplish anything meaningful, and that is when you know the positioning is bad.
The attack goals can be broadly categorised into the followings.
To attack an expansion
This is arguably the most common scenario in TvP and TvZ. Let say, you want to hit a timing when your Stim is ready, and you push out with your units including your Tanks. Your goal is to attack opponent’s newest (and usually the nearest) base with that force. A good example of such situation is the TvP build that I have previously discussed, and it hits a timing with two to three Tanks that can potentially destroy Protoss’ third. Below vod is an example of how to execute it.
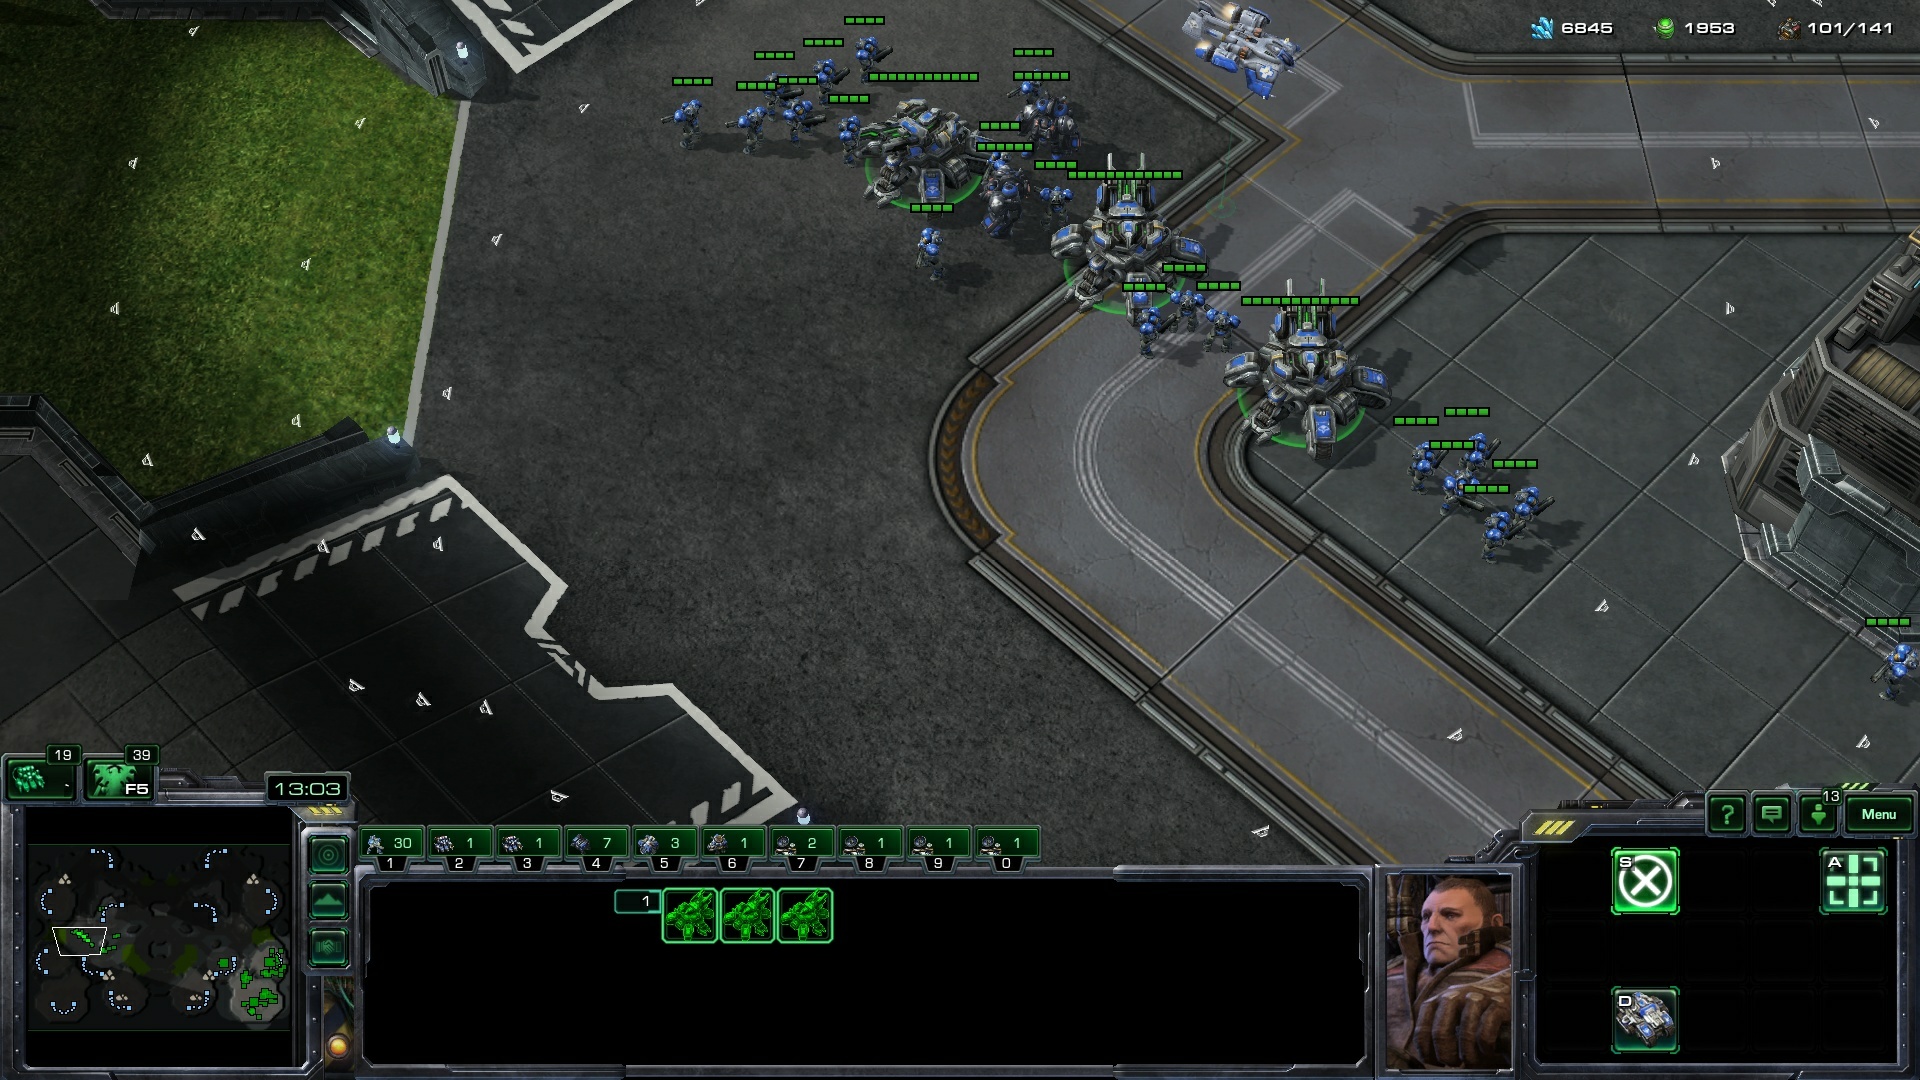
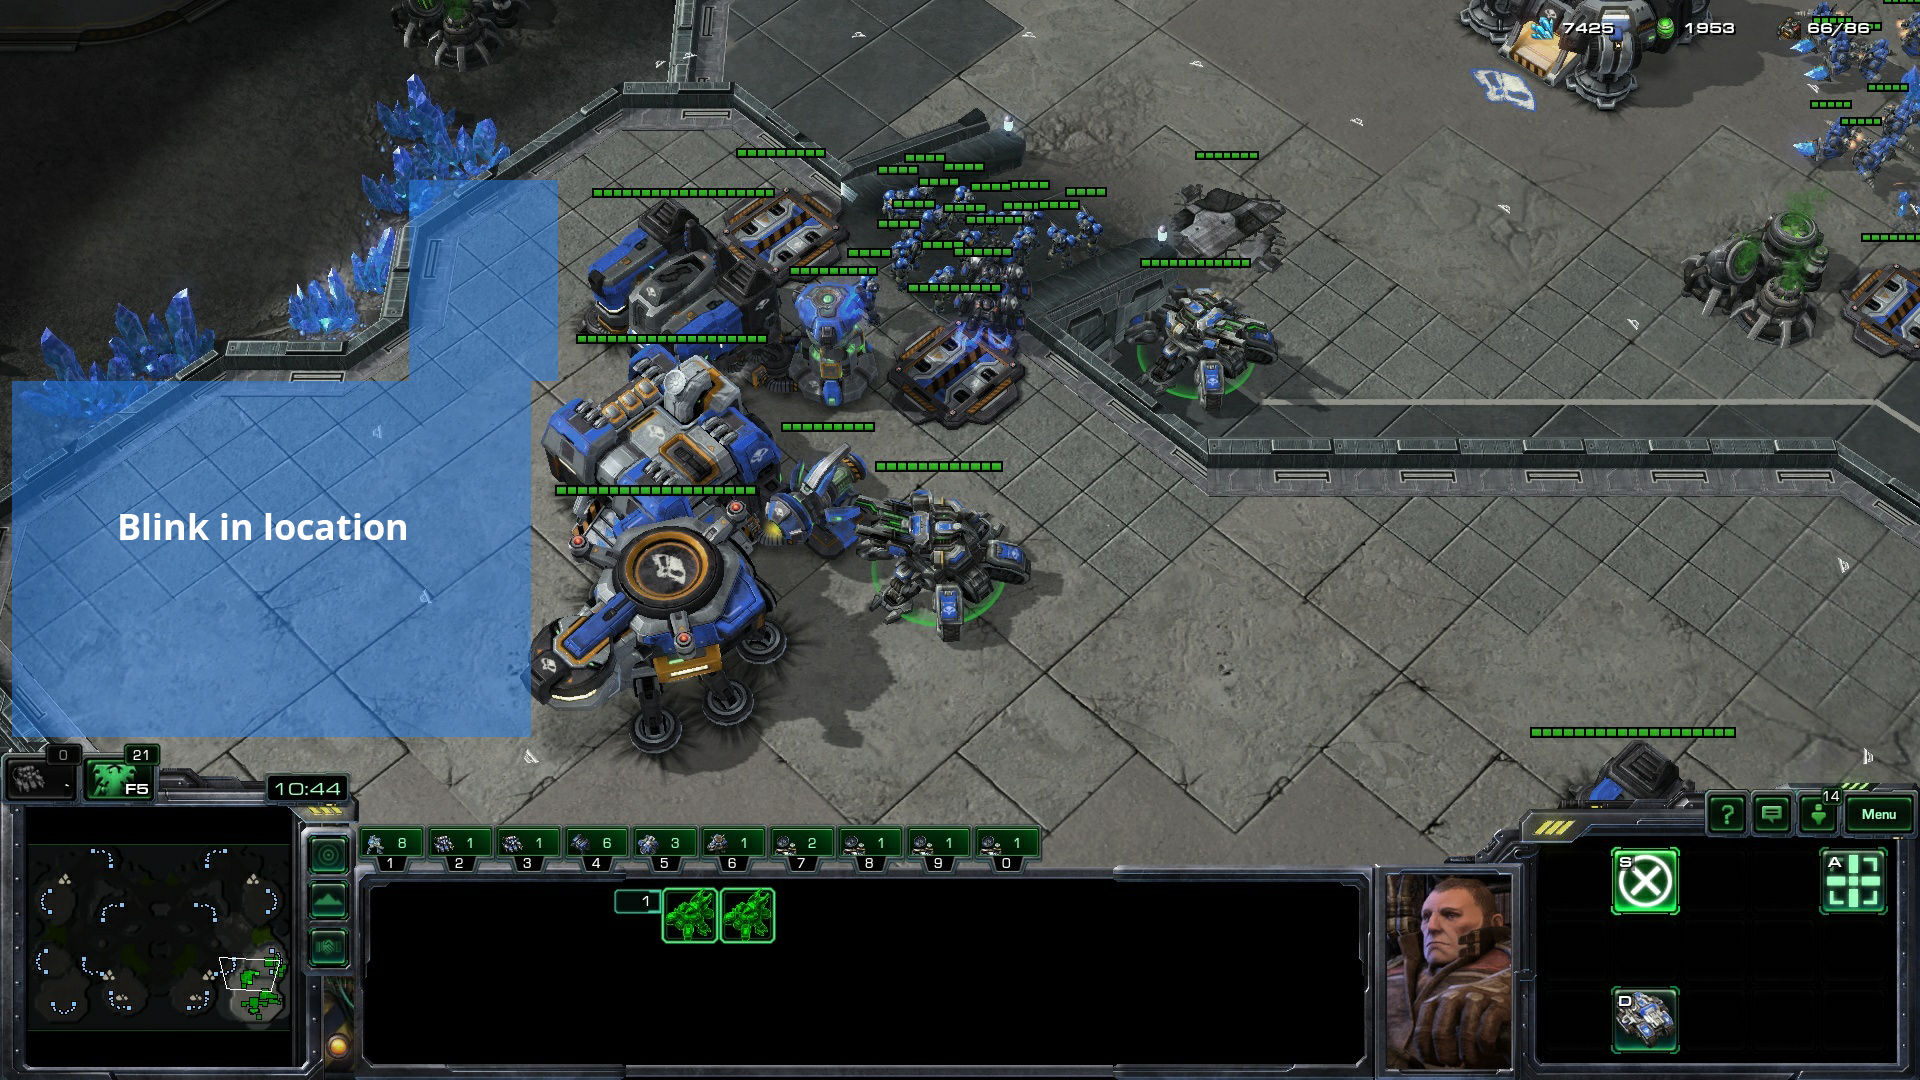
Recall that your Tank plays a supportive role to cover fire for your bio, so you should judge the siege up position based on your bio’s position. As your bio force attacks forward in the direction of the target base, opponent’s army is often positioned between your bio and that base. You want to have the Siege Tanks to position near enough to cover the area of the battle between your bio and their units, but at the same time they are far enough to not get attacked by opponent’s force easily. The below screen shot shows the range that I am referring to.
If the Stalkers were to battle the group of bio at the top, they would be in range of the Tank at the top. The bottom Tank is spaced out slightly for the reasons I have discussed before. Watch the vod above, and you will notice that the Stalkers could have picked off both Tanks with the single Blink if they were side by side.
I know it is tempting to siege up in range of opponent’s base main building, but it is risky to force your way there straightaway. Moreover, it is sometimes a good thing to not have the Tanks in range of buildings, because opponent can time the attack that breaks the Tank position by having the supposedly first shot on the units land on the building instead. That is, opponent’s units move in to attack when your Tanks are on the attack cool down (more than 2 seconds) after they have just fired at a building, and their units would then take a lot less damage.
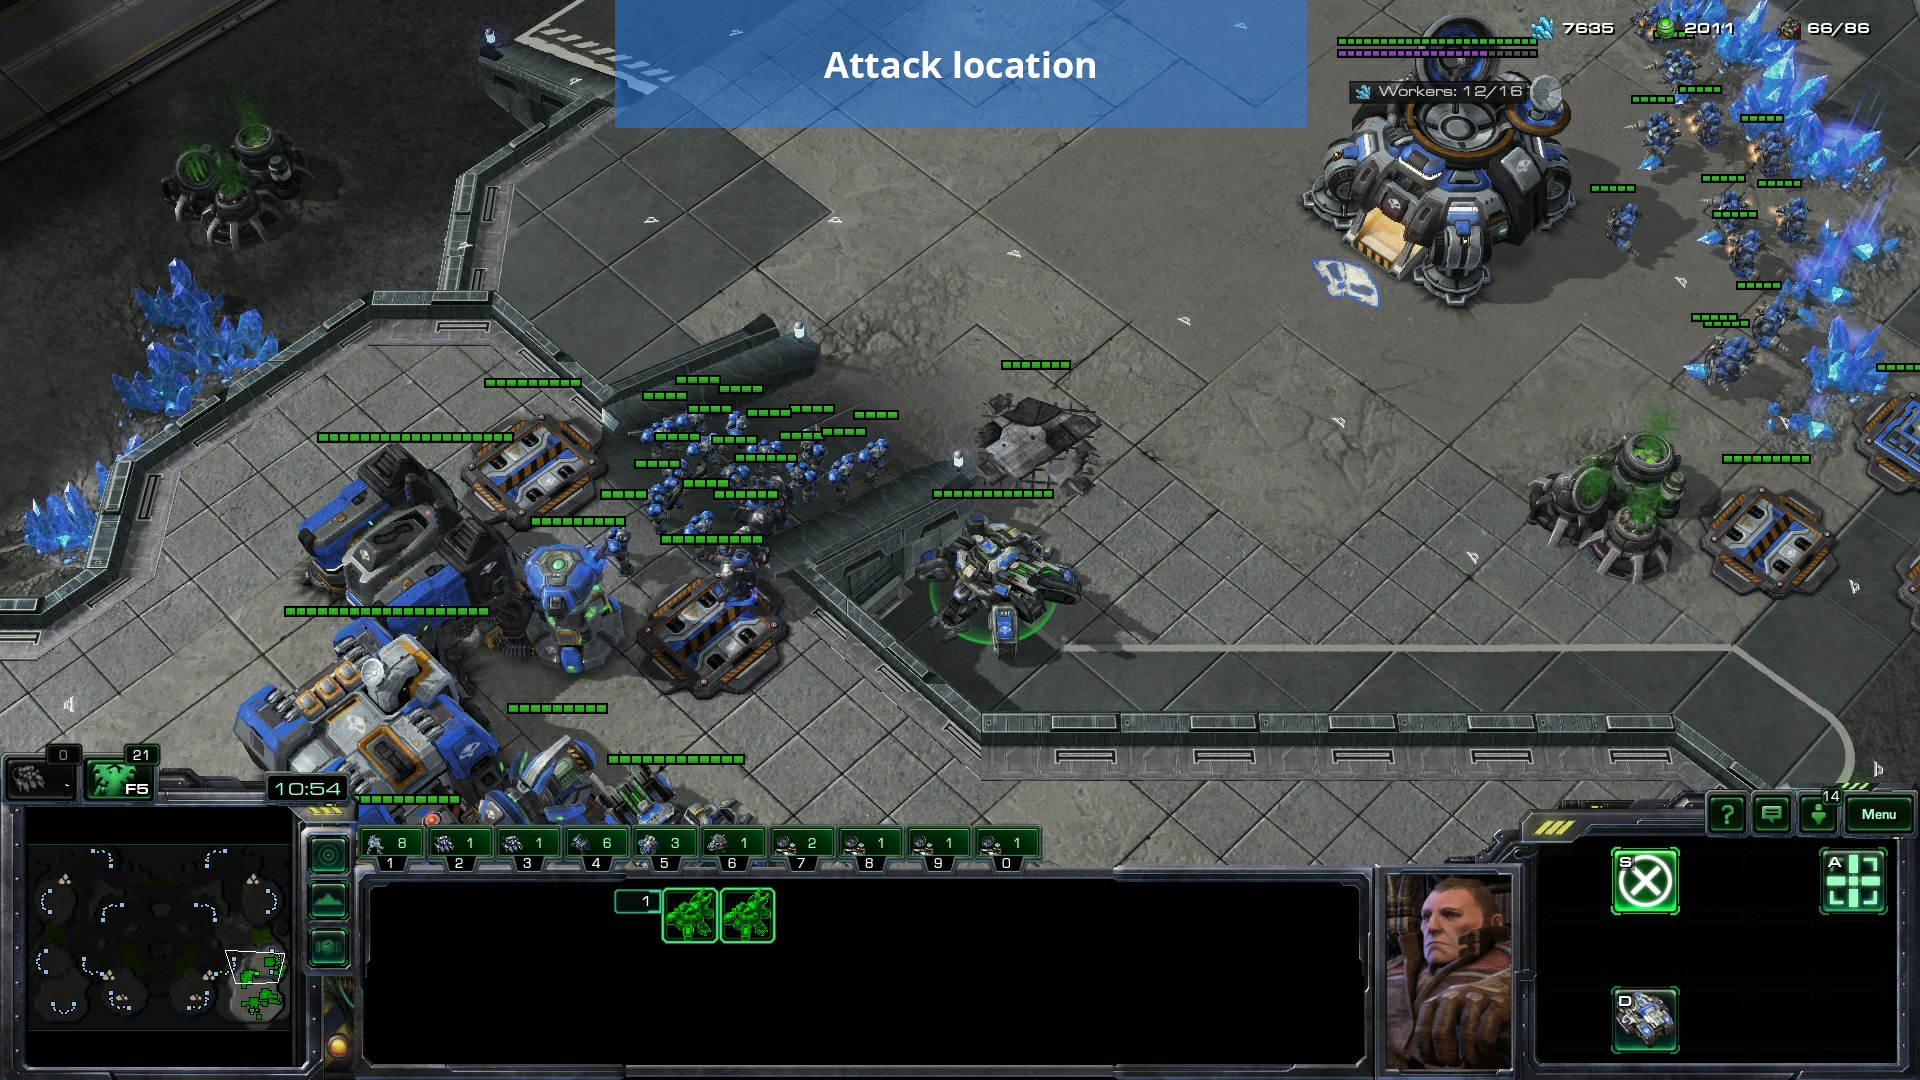
As you would have expected, the positions should also take terrain into considerations, and it is not meaningful to have specific locations for all the maps. Thus, the key considerations I have listed above should lay the foundation for Tank positioning. For example, you want to (1) let the opponent to attack into you, and also (2) filter them into a choke point if possible. I have already explained (1) above by suggesting how you can position the Tanks in relative to your bio force. The purpose of (2) is to force opponent’s units to group up as much as possible, and your Tanks are less effective when the opponent can form a nice concave as they attack in. Based on this logic, in the image above, Terran attack from the left and not the right, because the area is more open and wide on the right for opponent to form a concave. Another example is the third image in the “area lock down section” earlier.
To force a favorable trade
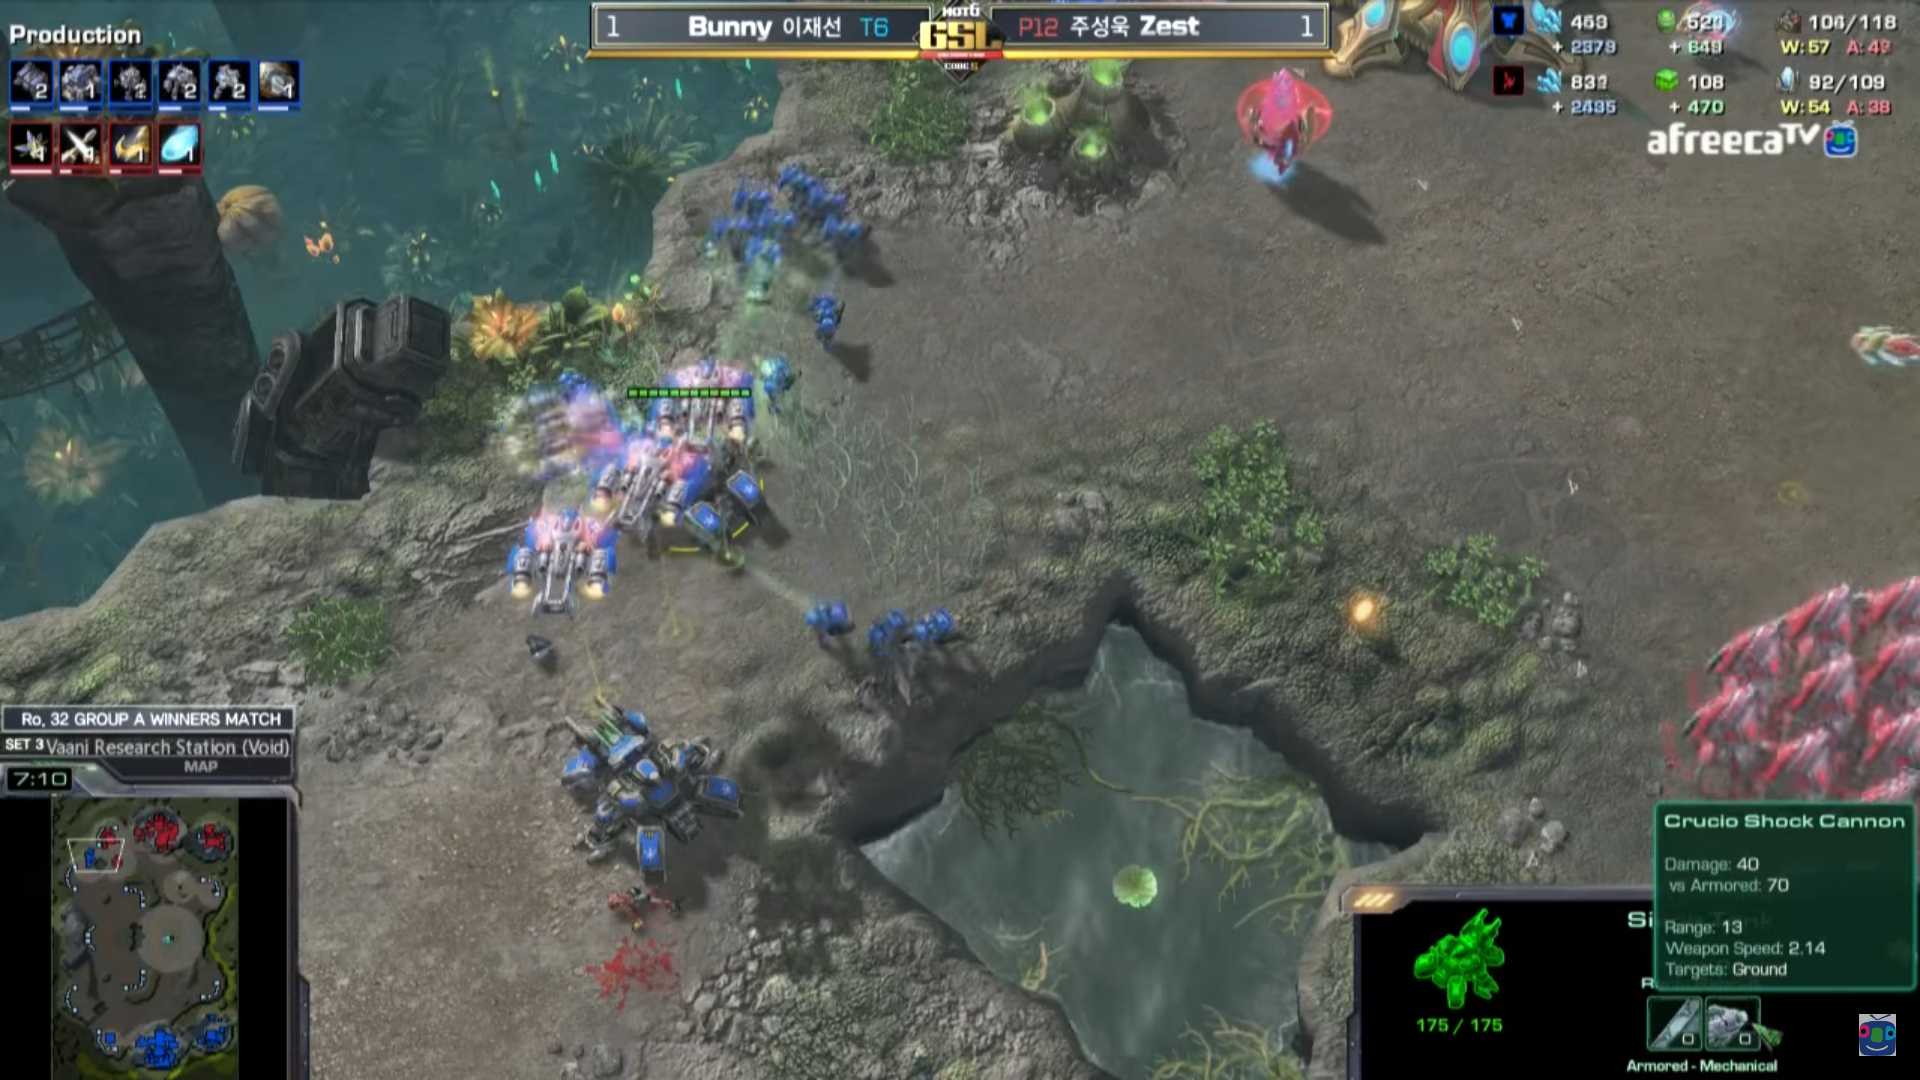
You may have noticed the above attacking a base situation is arguably not applicable in TvT, because the opponent has Tank too. It is almost impossible to siege up in a good position when you try to attack a base due to the insane defender advantage in TvT. The vod below shows you how the attacking player is unable to siege up in a good attacking position after constantly circling around the defending player’s bases the whole time.
TvT is the match up that depends on Tank positioning the most, and yet it is the hardest to siege up offensively. This often results in players siege up in the middle of no where with no constructive goal, and the group of units eventually got overrun by the opponent. This happens even in top level Terran mirror matches, as you can see in the vod below, Maru basically siege up at a location that does not accomplish anything and the result is bad. Therefore, the goal in TvT is often to siege up in a location that can force opponent to attack into you that results in a trade in your favor. This can be done by putting opponent on a timer. That means, the longer you remain siege up at that location, the more ahead you get.
A simple example is to do a big drop with Tanks in opponent’s base. Opponent is then on a timer to clear your units once you siege up in his/her base, as you are constantly dealing damage to either the buildings or the mineral line. Based on the basic rationale I stated above that you want the opponent to attack into your Tanks and not the other way round, it is almost impossible for opponent to come out ahead of the trade using the same units. The structures in the base also create choke points that filter opponent’s units for juicy Tank shots. In line with the goal of forcing a favorable trade, it is usually not a good idea to try to save the units by loading them into the Medivacs and leave, as you want to trade. Below vod is an example of forcing a favorable trade by dropping at a good location.
There are builds that involve dropping Siege Tanks with this goal in mind. For example, I have designed a build that drops Siege Tanks and Auto Turrets early on in the Terran mirror match up.
Of course, making a big drop in opponent’s base is not the only way to force a favorable trade. Again, the key is to put opponent on a timer, and this can be done by simply setting a Tank in range of opponent’s mineral line or production buildings. Below vods are some examples of how this can be done by making use of map terrain.
To contain the opponent
Containing the opponent is a relatively passive way of attacking whereby you simply deny opponent from leaving the base, and it can be a problem if the contain prevents the player from taking more bases. Thus, containing the opponent is also a way to put opponent on a timer. Similarly, by positioning your Tanks outside opponent’s base, the opponent has to attack into you and this is better than you attack into the opponent with Tanks in general.
However, there is one important tactical difference between containing your opponent and all the other attacking situations above, and that is your main concern is not to get your Tanks in range of opponent’s building or mineral line. You should focus on locking down the main path that opponent needs to get on in order to move out. It is important to note that the opponent usually have vision advantage in a contain situation, because there is either no ram (i.e., an equal condition) or your opponent has the high ground advantage with a ram. Thus, when opponent has the ram advantage, you should position your Tanks in such a way that they are only in range of the lower half of the ram. This mitigates opponent’s high ground advantage, and it is also consistent with the logic that you want to filter opponent through a choke (i.e., the ram). See image below.
In the vod below, you can see how ForGG tried to “contain” Polt, and I use quotation mark because you can say it is a “push”. His Tanks are more passive than the examples above, as he focuses on controlling the exit.
To win with it
If the goal is to win the game with that attack, then you are less likely to have the luxury to siege up and wait for opponent to attack into you. You more or less have to force a battle then siege up right there, so there is not much to talk about tactically. Below is an example.
When defending
The goal of defending is more straightforward, and it ticks the “let opponent attack into you” criteria by default. There are three questions in deciding where to position a Siege Tank defensively.
- What and when is the attack?
- Where is the attack coming from?
- Where do I want the battle to be?
The first question is basically the anticipation of the attack based on knowledge and information. The type of attack you expect informs you where the likely attack location is. For example in TvP, you would expect a Blink Stalkers timing to attack from the edge of your main that they can blink onto, an Adept Warp Prism attack to come from the corner of your base, and an Immortal burst to come from the front. At this point, you have all the necessary information to position your tank, and this is also when most players stop their thinking process about the position of the Tanks. I want to stress that the third question about where you want the battle to be makes a huge difference.
General ramps
Against most of the frontal attack towards your natural base’s ramp, you have to decide whether to defend the main ramp or the natural ramp. Then, you position the Tank based on where you want to defend.
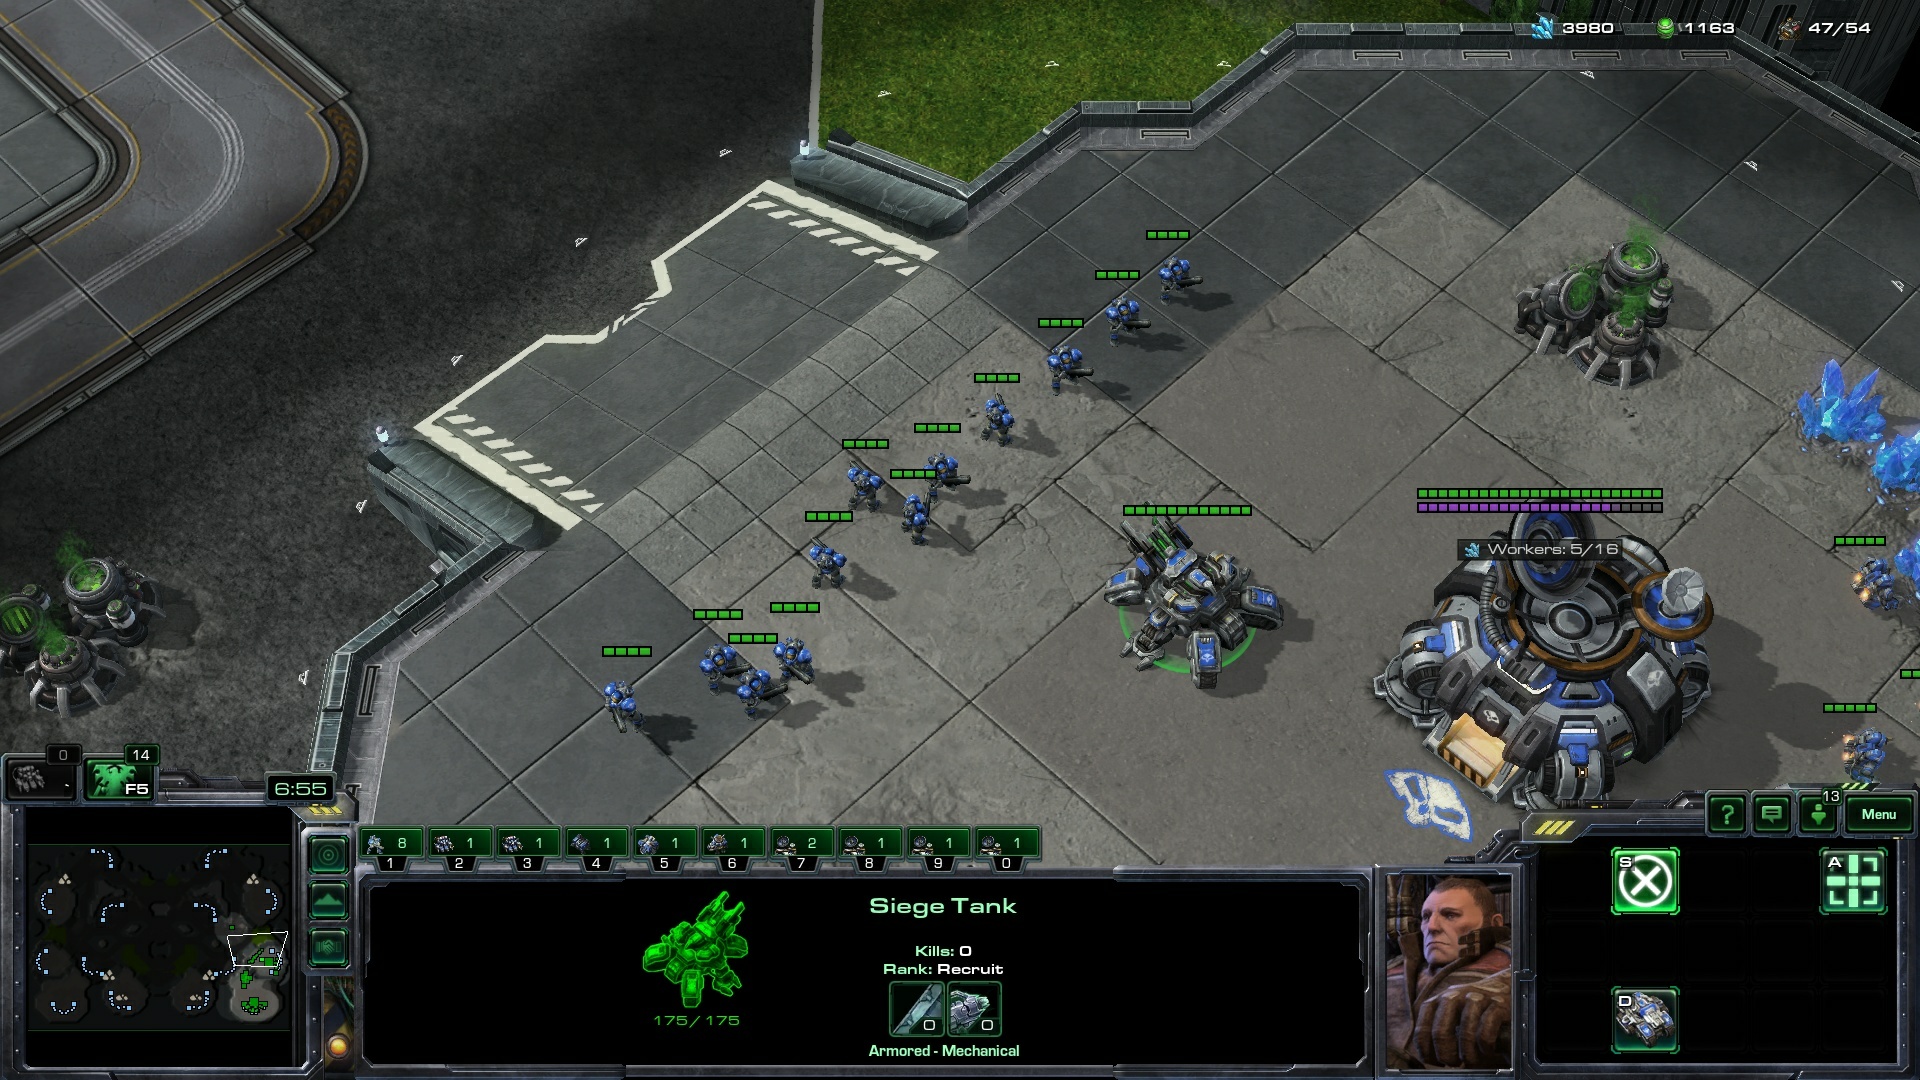
Let say you decided it is better to defend the natural ramp. In the image below, one Tank is placed right next to the natural ramp, and the other is farther back. The place you want the battle to happen is at the natural ramp as you have a slight high ground advantage, so you want to ensure your Tank covers that area. The one nearer to the natural ramp is a bad example, as it is easily picked off by the enemy even though it covers the ramp. The one farther back is in a good position, as it is able to cover the ramp and it fires when opponent’s units are filtering through the ramp. Also, it is easier to pull Scvs to repair it when it is nearer to the mineral line. The second image below shows how other units play a part in ensuring the Tank is not vulnerable.

If you want to battle at the main ramp, you should position where the Tank is in the image below. You want to keep the Tank at a certain distance away from the main ramp, so that the Tank can shoot the units that are coming up but these units are not in range to shoot back at the Tank.
The Tank position at the second image below is debatable. If you want to hold the main ramp, it is too vulnerable as it is too close to the ramp. If you want to hold the natural ramp, it is not that bad of a position as it covers half of the ramp and it is less vulnerable than when it is at the natural like in the image above. However, opponent can just move to the top of the natural base area and attack from there. Also, it is possible for opponent to pick that off from the low ground on the left if there is vision.
The above discussion should have covered most defending situations against a frontal attack, and the non-ramp specific situations are discussed below.


Versus Adept
You want to position the Siege Tank next to the Command Centre against Adept attacks. The Adept timing can attack from three main locations. The first is to shade or walk through the ramp directly, and the second is to warp-in at the natural base’s edge. The image below shows how positioning the Tank next to the Command Centre can cover most of the important locations. The third location is to warp-in in the main base, and you should position the Tank next the main Command Centre in such a way that it can also cover the potential warp-in location.

In the above vod, Maru’s Tank could have shot the Adepts if it was right next to the Command Centre, but his Tank’s position was slightly off. In the vod below, again, it shows the importance of positioning the Tanks next to both of the Command Centres.
Versus Blink Stalker
You want to take the battle after the Stalkers have blinked up and not before they blink from the low ground into the main base. This is because you don’t want the Stalkers to blink on top of your Siege Tank, and you can get some nice Tank shots against Stalkers that are not ready to blink. More specifically, you want to ensure the Tank is in range to shoot at where the Stalkers will land, and at the same time it is not in range of the Stalkers’ attack. If possible, you can use your buildings to prevent the Stalkers from closing in on your Tank. The next consideration is how much ground it can cover for the natural, as the Stalkers may not blink into the main and just attack the natural directly. See the images below. Beyond the topic of interest, you should position the bio at the main ramp, so that you can move to either of the two locations where the Stalkers can attack.
Versus Terran drop
There are three ways of dropping in TvT.
- Drop at the edge of the main base before running the units in.
- Drop right at the mineral line.
- Doom drop next to the production buildings.
Against all of these, you want to have the Tank to be positioned at a place that is in range of where you anticipate the units will be dropped in such a way that opponent’s units will start to take damage before they even get fully unloaded. When you defend your natural base where opponent will usually drop using the first and second method, it is a good idea to position next to the Command Centre like how I have shown above against Adept.
However, in the main base, you want to be mindful that opponent can drop on top of the Tank, so it is more complicated than simply put the Tank next to the Command Centre. If you position the Tank too “deep” into your main base to avoid opponent from dropping on it, it is hard to defend the edge. Thus, you want to position it deep enough in the main that opponent cannot see it when the Medivacs are entering your base, and opponent will instinctively start unloading near the edge. On the other hand, you want it to be near enough that your Tank is in range of those units that are unloading as the Medivacs are moving. I think a second Tank (or even more) makes a big difference against doom drop, as you can cover the ground by having good spacing.
Summary
There are a few key considerations for Tank positioning.
- Let opponent attacks into you instead of the other way round.
- Force opponent to move the units through choke points or narrow paths.
- Space out your Tanks at a comfortable distance.
When attacking,
- the tactical decisions should be goal-oriented.
- opponent should be put on a timer.
When defending, you should consider these three questions in this order.
- What and when is the attack?
- Where is the attack coming from?
- Where do I want the battle to be?
If you enjoyed this article, I’d love you to share it with one friend. You can follow me on Twitter and Facebook. If you really like my work, you can help to sustain the site by contributing via PayPal and Patreon. See you in the next article!

And finally using the leapfrog trick to make Tank positioning much more easier :)))
I thought of discussing about leapfrogging, but it’s not exactly about “where” to position.
Dude, what a beast of an article. Amazing to read and learn that. Waiting anxiously for the next article. Blizzard should hire you, Max.
Just being featured by Blizzard would have been amazing.
Five-star article! Will read this over many more times.
Well said!
Excellent read. I kind of knew a lot of this already, but wasn’t always as mindful about it in game… I’m sure I will be now. Will be thinking of this article next TvT game I get into. Thanks!
Tankivac change made TvT interesting again.