

“How to set up one’s control groups for Terran” is a question that pops up very often on forum. Every race is different, and here is what I think is ideal and practical.
Comfort versus ideal
First and foremost, you can have whatever set up you want as long as you are comfortable with it. There is no right or wrong.
Of course, there are some set ups that are considered better than most and are adopted by many. Ideally, you want to have the shortest time to execute an action, and this can be achieved by following these two rules.
- Minimum number of “clicks” required to do an action.
- Minimum finger travel time from one key to another.
The best example for the first rule is that you group your multiple Barracks with the same control group. So all you have to do is to click that control group key once, and click the hotkey of the unit you want to produce multiple times (or hold it) to produce that unit. Simple.
The second rule is where the controversy happens. Most, if not all, players start with the default control group and hotkey settings. That means, your control group is 1, 2, 3, 4… 9, 0, and you click ctrl + the number to bind it. However, that may not result in the shortest finger travel time, and TheCore set up is built on this very idea of breaking away from the norm to improve efficiency. While I agree with the rationale of it, I don’t find it that intuitive. Like many, I find it hard to switch from the original settings to TheCore. If you like it, good. But just remember there is no right or wrong.
The reason I bring this up is to highlight the trade off between the theoretically ideal set up and the practically comfortable set up. The set up considerations I mention below are based on the default set up, which is adopted by most people.
Types of control group
There are several types of “things” you want to set up control group for Terran.
- Unit
- Command Centre
- Production buildings (Barracks, Factory and Starport)
- Upgrade
Unit
Again, it is a trade off between comfort and ideal. Ideally, you want to have as many control groups for units available (you can don’t use them), but you don’t use that many practically. You want to have minimum two control groups for units, and three is the optimum number in my opinion. I will not bother to explain too much, as it is down to comfort and the race itself. Most Terran progamers I know are using either two or three control groups for units.
Command Centre
You should have only one control group for Command Centre, as it is much more efficient to produce multiple Scvs with multiple Command Centre. Use camera hotkey if you want to move from one Command Centre to another. The only time that a separate control group may be useful for a specific Command Centre is when you build it in your base and you want to land it to the mining location. But, in my opinion, manual clicking may actually be better.
Production buildings
This is where different opinions come in. There are two main ways of doing this.
- Group all three types of production buildings together in one control group.
- Separate them into three control groups.
The first one requires you to use tab to move from one production building to another, and the group priority is always Barracks-Factory-Starport. Thus, if you want to go through a production cycle and produce from all three buildings, you need to click,
- Control group – Barracks unit hotkey – tab – Factory unit hotkey – tab – Starport unit hotkey
The second one requires you to click the separate control group key instead of the tab key, and both ways require the same number of clicks for a production cycle.
- Barracks control group – Barracks unit hotkey – Factory control group – Factory – unit hotkey – Starport control group – Starport unit hotkey
The key difference between the two is the convenience and flexibility of the rally point. If you want to have all your production buildings to rally to the same point, the first method is more efficient than the second. This is because you only need to select the control group and right click on the location for the first, but you need to repeat the same action for each production building type because they are not in the same control group. That is the difference of two clicks and six clicks for each rally, and there is a good chance that you may make a mistake in rally point because you missed one of the six clicks. However, the second method allows you to have the flexibility to rally different production buildings to different places. For example, you want to have a Cyclone and a Viking to station on the right and left side of the base respectively, you can rally the Factory to the right, and the Starport to the left independently.
The second method actually has another advantage over the first when it comes to swapping between bio and mech composition (it can be in different games). It is awkward to play mech with the first method, because neither including the Barracks nor not including it into the production control group hotkey feels right. If you include the Barracks, which is the set up you are used to, you must click tab first before you start your production cycle. It is just unnecessarily inefficient. In contrast, if you exclude the Barracks (which allows you to start production without clicking tab), your muscle memory of “tabbing” to the Factory production may make it an awkward experience.
I have come up with a way to have the rally efficiency of the first and the flexibility of the second by combining the two, and I will discuss it later in the post.
Upgrade
This is something that has been overlooked by some. You should have at least one control group for upgrades. By upgrades, I am referring to buildings like Engineering Bay and Armory. You want to use control group rather than manual clicking for upgrade, because you want to continue your upgrade as quickly as possible. While you rarely select these buildings, you are unlikely to build these buildings at the same place every game. Thus, it is still better to have them in a control group. Moreover, the control group of upgrade allows you to know whether your upgrade is done, and this will affect your decision making on whether to make an engagement. Whether you want to separate the two types of upgrade buildings into two different control group is more of a preference than pro versus con in my opinion, because you don’t often click it.
Tech Lab can also be added to a control group for the same “check before your decision to engage” reason, and this is particularly important if you are waiting for crucial upgrade like Stim to complete. Personally, I have a separate control group for Tech Lab, and not group it together with Engineering Bay and Armory.
You can also choose to group the upgrades with the Command Centre, and it is down to preference again. Do not group your production buildings with the Command Centre, because they will have different rally point location.
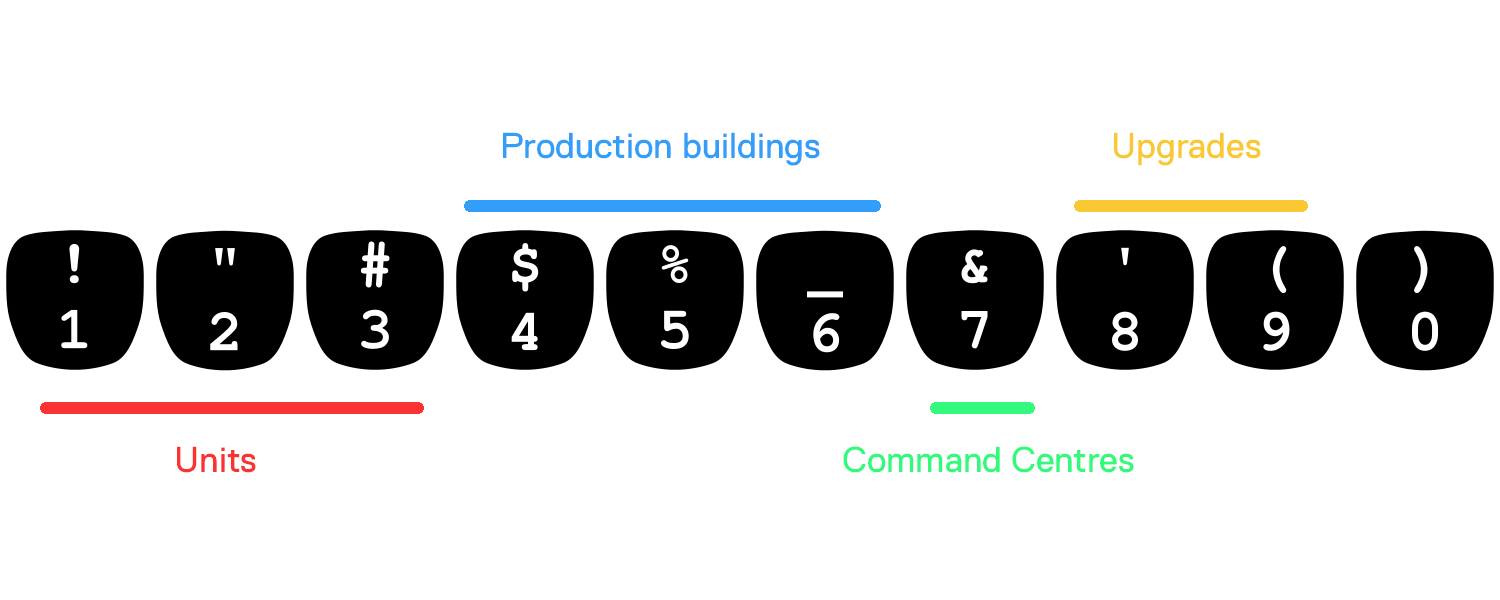
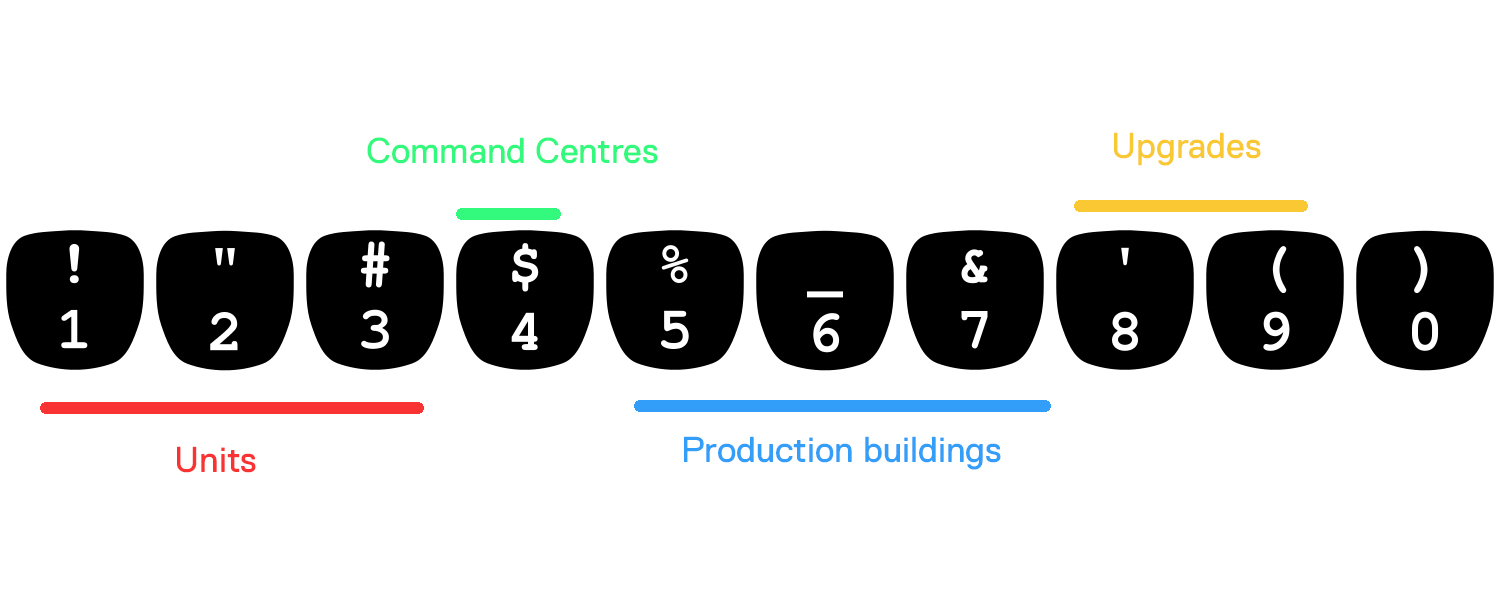
Order of control groups
This is mainly down to preference, but I think it is more convenient to have the most commonly used control groups on the left (starting from 1), and the least commonly used control groups on the right (far from 1). This is because most hotkeys are on the left (e.g., A), and hence, it is more efficient to have your hand stay near to the left side of the keyboard as much as possible. Usually, the most commonly used should be the units, and the least commonly used should be upgrades. The selection frequency of Command Centre and production building is up for debate, because it depends on how long the game lasts. You select the Command Centre more in the early game since you usually prioritise Scv production. Conversely, you don’t often select Command Centre for production after you have saturated your worker count (you still use it for scan and mule).
Below are some examples with the second method I mentioned above. The only difference is the positioning of production buildings and Command Centre.
My combination method
I have already stated the pros and cons of the first and second method for production building above, and here is what I do myself to combine the pros and eliminate the cons of both methods. Below is my set up.
1 – Unit
2 – Unit
3 – Unit
4 – Barracks + Factory + Starport
5 – Factory
6 – Starport
7 – Command Centre
8 – Upgrade
9 – Upgrade – Tech Lab
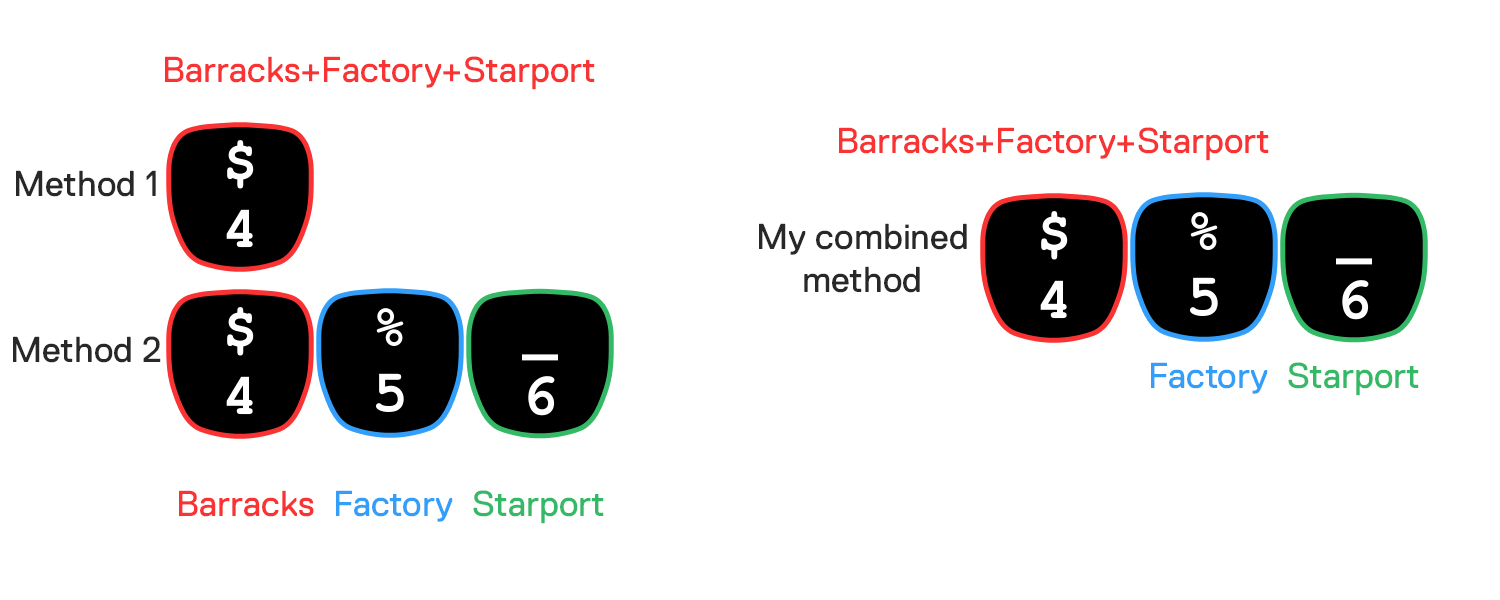
This is not the first time I have posted my set up here, and this post is meant to be less exploratory. I was using the second method, and I simply add in the Factory and Starport to my Barracks control group while I keep everything else the same.
I don’t have to change my production cycle, as I still go to “4” for Barracks since Barracks is prioritised when the production buildings are grouped together. I still use “5” and “6” for Factory and Starport. This solves the inefficient rally problem of the second method, because I can just select “4” (the combined control group) and rally every production building. At the same time, I don’t exactly have to forfeit the flexibility of independent rally for Factory and Starport.
If you have been using the second method, I strongly recommend you to try mine as you don’t have to make any inconvenient adjustment. It may be harder for players of first method to adopt my combined method.
If you enjoyed this article, I’d love you to share it with one friend. You can follow me on Twitter and Facebook. If you really like my work, you can help to sustain the site by contributing via PayPal and Patreon. See you in the next article!

I really like your combined method, I’ve been meaning to try it out for a while as I actually noticed that Flash was doing it!
Oh, I didn’t know Flash does it too.
I use TheCore and I use this combination with it And I will change it in the near future back to separate CGs (I also have the TechLab/EBay/Armory together with my CCs). Why? It isn’t fast and intuitive enough for me. TheCore offers access to all 10 CGs in a very comfortable way and with the Hotkey Trainer, Location Trainer and (hopefully) the upcoming CG Trainer I will adept again very fast to my switch from TheCore 2.0 to 3.0.
I have not used TheCore myself, and I don’t intend to. I really like the idea though.
Interesting post, I’ve noticed that later in the game Maru combines his production for easier rally points. I’ve found that having ebays on my cc hotkey means I miss less upgrades as I am often selecting this key to check on SCV production. So I have 1-3 as units, 4 as CC and ebay and 5 as production. This keeps everything close to the left side of the keyboard and keeps all my buildings on two hotkeys.
Have you looked into the fleetkeys setup? I’ve switched to it recently, made a few modifications, and am very happy with it. It mixes the efficiency of TheCore with the intuitiveness of the standard system.
I have never heard of fleetkeys, but I will google it.
1 2 3 units and 4 5 production basically what I do, but it runs into some problems in late game when you want to use many groups of units, especially in TvP.
LotV general lack of vikings has made it easier, but in HotS putting 1 to main army, 2 to ghosts, 3 to vikings was rather limiting and made it hard to do other tasks like drops/runbys. I normally put drops to 3, but it’s relegated to vikings now.
I always find it extremely important to hotkey vikings separately, since they are so fragile.
I had this problem as well. My solution was to use groups 1-5 as various army ones (drops, casters, harass, etc.) and then rebind 6-9 to Q W E R, with R for bases, E for rax, W for fact, Q for port. It’s been working pretty well for me.
I do that now actually.
` Starports
1 CC
2 Rax + ebays
3 Facts + armouries
4 Main army
5 Support (vikings, second attack group, early game scout)
6 Harass
Q Harass
W Ravens
G Ghosts
And then re-assigned all abilities and units to be able to be reached comfortably given the hand position I would have after having pressed the control group key. Nearly every unit ability / spell is on E.
Quite interesting, it would be also interesting to know how do you distribute your units along the groups (for example MMM in one group, tanks in other…), maybe a general post about engaging.
Thank you anyways, great job
I have researched on that, and I notice it varies a lot. Interestingly, it varies more on the situation than on the player. For instance, all players will have all the units in the main army in one group, and Ghost if any in another group. The second army is usually hotkey too. But overall, the type of army is not separated by hotkey often, and the pros rely on manual selection.
This is great content, thanks ! I will definitely try out some combination as you suggest.
By the way I would be interested to know what you think about an idea I had for people trying to improve their macro cycle (aka beginners): I personnaly use a specific hotkey for those csvs whose task is just to build depots. Usually there are 2 in the group for me. I create the hotkey while they are building the wall, then I move them to some dedicated area in the main and whenever I cycle, the hotkey is useful especially because this area position changes a lot accross maps and I don’t have to consciously think about where they are every time. In fact this has helped me keeping the base very clean, and reducing supply block in a noticeable way.
Thanks! Take a look at this. https://terrancraft.com/2017/05/18/es-mechanics-basics-and-macro/
Thanks, I will :) By the way, just so you know I did not receive any email notification when you answered even though I checked the box below named “Notify me of new comments via email.”
Ah, thanks for letting me know. I’ll check the setting.
Thank you so much for the helpful guide! I’m starting to put my upgrades all onto one keybinding rather than searching for the structure in my base but I never thought about the tech lab. Thank you!
Here is my current setup (with where im putting my upgrades now)
1- Units
2- Units
3- Barracks, Factory, Starport
4- CC
5- Upgrades
6…- Nothing (Should look into expanding into these keys)
I recommend expanding your unit groups from two to three.
Just curious why is 0 not considered an option for the hotkey even though it is free and available?
0 is an option. Many use it too. It is just too far for me.